
Guide to Fast Move Mechanics

How exactly does Fast Move damage and energy work? What are sneaks, and how should you time your moves? In this article, we’ll go over the mechanics behind Fast Moves and how they impact gameplay.
Special thanks to FlarkeFiasco, GarretK19383, and TheMisterValor for bringing these mechanics to my attention and helping to compile and video examples for initial Fast Move mechanic work! This was an incredibly challenging puzzle to solve and it couldn’t have been done without their help.
Also check out Wallower, who has in-depth videos discussing move timing and other concepts discussed in this article.
Jump to a section:
Turns
Trainer Battles are broken up into turns. Each turn lasts 0.5 seconds. On a typical turn, each Pokemon can take one action - a Fast Move, a Charged Move, or a switch. Let’s take a look at how Fast Moves use turns and interact with one another.
Each Fast Move lasts a certain number of turns, usually referred to as its “duration” or “cooldown”. Duration determines the amount of time between your Fast Moves. The timelines below illustrate different Fast Moves and their durations. Each circle represents a new action.
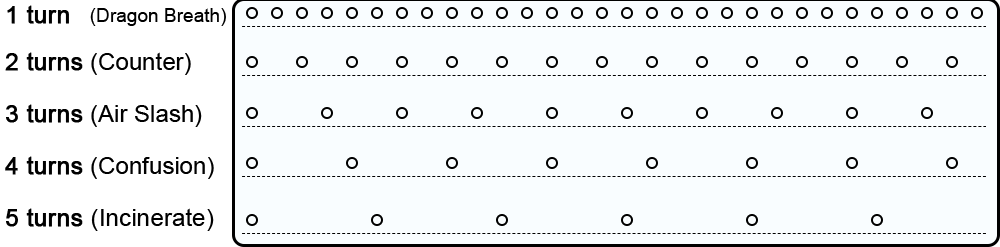
As you can see, a shorter duration allows more frequent actions. You can fit 2 Counters in each Confusion, or 5 Dragon Breaths in 1 Incinerate.
Fast Move Registration
When you use a Fast Move, it doesn't hit right away. Fast Move damage and energy register on the last turn of the move. If you're using Counter, a 2-turn move, the animation begins on turn 1 and the damage and energy register on turn 2.
Check out to the table below for move durations, the number of turns that need to pass before the move hits, and example moves. Note that 1-turn moves register immediately on the turn they are used.
| Duration | Turns to Register | Examples |
| 1 | 0 | Water Gun, Dragon Breath, Bug Bite |
| 2 | 1 | Counter, Vine Whip, Mud Shot |
| 3 | 2 | Air Slash, Fire Spin, Bubble |
| 4 | 3 | Confusion, Volt Switch |
| 5 | 4 | Incinerate |
So what does this look like in action? The examples below show circles for when you tap to use a Fast Move and squares for when the move actually hits.
2-Turn Move vs. 2-Turn Move

Above we have a mirror match where both Pokemon’s Fast Moves have the same duration. Damage and energy register on the 2nd turn of the move, so play alternates between Fast Moves being used and Fast Moves hitting.
2-Turn Move vs. 4-Turn Move

Things play out similarly when the Fast Moves involved are even with one another. For example, Counter (2 turns) and Confusion (4 turns) happen in step so Confusion registers simultaneously with every other Counter.
1-Turn Move vs. 3-Turn Move

In battles against a 1-turn move, the 1-turn move registers damage and energy each turn. Pokemon with 1 turn moves can maximize their move timing to throw at any interval in the opponent's animation.
2-Turn Move vs. 3-Turn Move

Some Pokemon matchups involve move timings that are out of sync. For example, a 2 turn and a 3 turn move line up every 3rd move. This can require specific counting or paying close attention to the move animations.
Optimal Move Timing
Why does timing matter?
When you use a Charged Move, you interrupt any ongoing Fast Moves to begin the Charged Move sequence. The Charged Move sequence resets all Pokemon cooldowns/animations. Afterward, both Pokemon can immediately act again. When you interrupt an opponent's Fast Move, you effectively grant them "free" turns and allow them to attack more frequently than if you had not interrupted them.

In the above example, Counter Medicham (2 turns) is throwing Ice Punches at Incinerate Talonflame (5 turns). Incinerate has a very long cooldown, but each time Medicham uses a Charged Move, Talonflame is able to immediately attack again. Ordinarily, it would take 15 turns for Talonflame to use Incinerate 3 times. Here, it takes 8 turns for Talonflame to use Incinerate 3 times because Medicham is interrupting its Fast Moves and granting Talonflame "free" turns.

Here, Medicham is timing its Charged Moves optimally. By throwing Ice Punch on the last turn of Incinerate (the same turn it hits), Medicham grants Talonflame zero "free" turns.
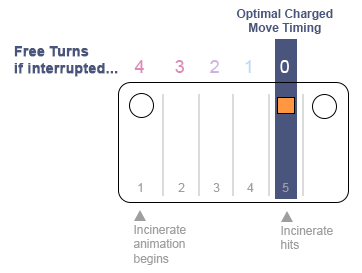
The goal of optimal move timing is to reduce the number of "free" turns you grant your opponent when you use a Charged Move. The graphic above highlights how many free turns you would grant your opponent if you interrupted their Fast Move on the specified turn. It's most optimal to throw your Charged Move on the last turn of your opponent's Fast Move. Throwing at this time results in zero "free" turns and doesn't allow your opponent to attack on the same turn as your Charged Move (see "Sneaking" below).
Optimal move timing is largely impossible in mirror matches or other matchups where your Fast Moves align (such as a 2 turn vs 4 turn Fast Moves).
Sandbox Mode
You can use the site's Sandbox Mode to further explore the impact of move timing and mechanics. When you enter Sandbox Mode, circle icons appear above the timeline to indicate when each players can use an action, like what’s been shown in the article so far. These appear at regular intervals like you might be used to, dictated by Fast Move duration. Click on the circular Tap icons to select an action for that turn.
You can select one of the following actions:
- Fast Move - This player will use a Fast Move. This action will queue a new Fast Move to be registered as described in this article.
- Charged Move - This player will use one of their Charged Moves. Note that a Charged Move will fail if a Fast Move that faints the user also registers on that turn.
- Wait - This player will take no action on the selected turn.